DIY Light & Sound Pumpkin for your Amazing Halloween

Level Up Your Jack-O’-Lantern!
Are you ready to transform your humble pumpkin into the undisputed superstar of Halloween? This year, we’re not just carving; we’re creating a spooktacular experience that will drop jaws and send shivers down spines!
Forget sad, flickering candles we’re going high-tech with sound, light, and Pure Halloween magic.
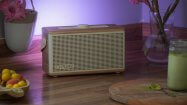
We’re talking about combining your carving artistry with the incredible Pure Woodland Glow, a sound and light device that will make your pumpkin sing, glow, and haunt in style! Ready to make your pumpkin game extra strong?
Here’s What You’ll Need:
- A large pumpkin (minimum 35 cm tall and 35 cm wide)
- Pure Woodland Glow device
- Carving tools (knives, scoops, stencils)
- Marker
- Aluminium foil
- Gloves (optional, for cleaning out)
- A killer Halloween playlist!
Step-by-Step Guide to Your Ultimate Halloween Pumpkin:
Step 1: Choose Your Pumpkin!
This is where the magic begins and where good sound is born! To truly accommodate the Pure Woodland Glow and give your spooky soundtrack the chamber it deserves, you need a substantial pumpkin.
Aim for a pumpkin that is at least 35 cm tall and 35 cm wide. The bigger and rounder, the better! A larger internal volume means better acoustics and a richer sound experience for your Halloween tunes.
Step 2: Choose Your Masterpiece!
Now for the fun part, choosing your pumpkin’s personality! Whether you’re going for terrifying, whimsical, or classic, pick a design that speaks to your Halloween spirit. Draw the design with a marker on your pumpkin.
Here are some of our favourites to inspire you:


Step 3: Create the Top Opening
With your design chosen, it’s time to prepare the pumpkin for its internal upgrade. Using a sturdy carving knife, cut a large circular hole around the stem.
Make sure this hole is at least 14 cm in diameter. This is crucial to ensure your Pure Woodland Glow can comfortably fit inside. A slightly larger opening makes it easier to clean and place the device.

Step 4: Clean & Create the Sound Chamber!
Scoop out all the guts, seeds, and stringy bits! Get it as clean as you can. Then, here’s a pro tip for better sound and device fit:
Shave a bit from the bottom interior of the pumpkin. Don’t go too thin! You still want a good, solid layer of pumpkin flesh (around 2.5 cm to 4 cm) to act as a sturdy, sound chamber.
Step 5: Bring out the knife!
Now for the main event! Carefully carve your chosen design using your tools. Take your time, especially if it’s an intricate pattern. Remember, the holes you carve will be where the light (and sound) escapes, so don’t make them too small, nor too big!
Step 6: Special Tipp – Aluminum Foil
This is a smart little trick! Once your pumpkin is carved and clean, line the bottom interior with a layer of aluminium foil.
This not only helps protect your Woodland Glow from the pumpkin’s moisture but can also act as a reflective surface, helping to amplify the light and direct the sound a little better.
Step 7: The Grand Finale – Light on, Sound on loud & Spooky Vibes in …3, 2, 1!
It’s showtime!
- Choose your spooky or Halloween party soundtrack. We have prepared 2 playlists for you:
- Spooky Sounds:
- Halloween party soundtrack
- Turn on your Pure Woodland Glow (make sure it’s charged!).
- Carefully place the Woodland Glow into the pumpkin through the top hole. Adjust it so it sits stably on the foil-lined bottom.

Step 8: Enjoy & Happy Halloween!
Step back and admire your handiwork! Your pumpkin is no longer just a decoration; it’s an audio-experience! Well done!

Next project: What about a glowing ghost to match your Halloween setup? Don’t miss our other DIY guide: Click here!
*Idea and concept by us, brought to life with an AI sidekick.